Randomized Lighting in Home Assistant

I recently did a video on how to setup randomized lighting to simulate human presence over on my YouTube channel. If you haven’t checked that out, you should watch it first.
In this post I walk you through how I set up this randomized lighting effect in more detail. There are other ways to do this using third-party add-ons or integrations, but I wanted to show that you could do all of it in native Home Assistant.
Because this gets into some advance topics it can be intimidating for those new to Home Assistant, but I think you will find it easier than you expect. Either way though, by the end of this article you will have a basic automation to randomize lighting in your house.
Project Overview
We are going to create an automation that grabs a random light or switch from a group and turn it on. Then after a delay of time between 5 and 59 minutes we will turn it off. And we will repeat that pattern until we cancel the automation, or the sunrises.
The Entities
The first step is to create a list of lights and switches to use. For this we are going to use a group.
To define a group we are going to have to edit the config files. I like using the File Editor add-on in home assistant for this. If you don’t already have that setup check out this video ()
I used the name vacation lights for my group.
Where you define this group will be based on your setup. If you have not setup a groups.yaml file, then you can define in your configuration.yaml like this:
group:
  vacation lights:
    - light.front_door_lamp
    - light.living_room_lamp
    - light.living_room_tower_lamp
    - switch.fireplace_lights
    - switch.croft_light
    - light.skylars_dresser_lamp
If you are using the groups.yaml then the setup will look like:
vacation lights:
  - light.front_door_lamp
  - light.living_room_lamp
  - light.living_room_tower_lamp
  - switch.fireplace_lights
  - switch.croft_light
  - light.skylars_dresser_lamp
Just add a – (dash) before each entity you want to include. And don’t worry about mixing lights and switches. We haver a solution for that.
Once you have your group defined, save your changes, and then either restart Home Assistant, or head to configuration > server controls, and reload groups by selecting “Groups, Group Entities, and Notify Services”

Helpers
After that we need to define a couple of helpers.
For that head to Configuration > Helpers
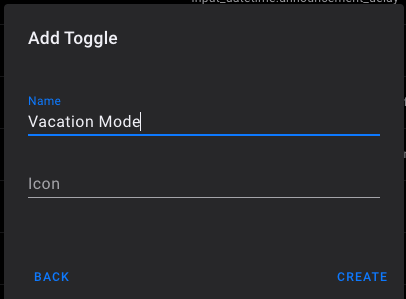
The first Helper will be called Vacation Mode, and we will use this as a condition to ensure our lightning effect only happens when we are gone, and to cancel the effect if we happen to come while it’s running.
Click “Add Helper” and choose toggle, and give it our name, and click create
After that we need to create a text helper to store our chosen entity. This will be used as a variable to ensure that during this process the automation doesn’t get confused about which light or switch it should be automating.
So click Text from the list of Helpers and then give it a name. I am using Current Random Light

Once done click create.
Scripting the Effect
For the main part of this automation we are going to use a script. Using a script will give us an easier way to start and stop the effect over using just an automation.
So head to Configuration then Scripts and click “Add Script” in the lower right.
I named this script “randomize vacation lights”

Since we are going to be using templates in this script we are going to end up writing this in YAML, so under Sequence go a head and click the three dots in the upper right and choose “Edit in YAML”
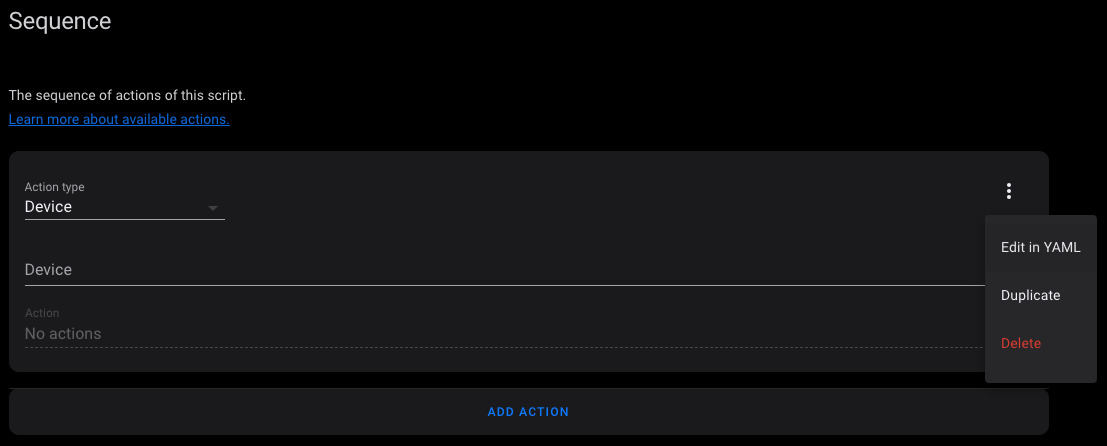
Now your Script Editor will look like:
Don’t worry, since you are here you can just copy and past the next part. Just replace the default YAML with this:
repeat:
  until:
    - condition: sun
      after: sunrise
  sequence:
    - service: input_text.set_value
      target:
        entity_id: input_text.current_random_light
      data:
        value: '{{ state_attr(''group.vacation_lights'',''entity_id'') | random }}'
    - service: homeassistant.turn_on
      data:
        entity_id: '{{ states(''input_text.current_random_light'') }}'
    - delay:
        minutes: '{{ range(5,59) | random | int }}'
    - service: homeassistant.turn_off
      data:
        entity_id: '{{ states(''input_text.current_random_light'') }}'
    - service: input_text.set_value
      data:
        entity_id: input_text.current_random_light
        value: None
And your script should now look like:
And if you named everything as I have so far then you should be good. If not, you will need to update the entities in the script with the names you used.
Now that we have that let’s talk through what it is doing.
Lines 1 – 4 tell the script to repeat until sunrise.
Line 5 starts the sequence we want to repeat.
Lines 6 – 10 define our first action. We are calling the input text set value service to update our current random light text helper. Then for value we are using a template to get the value of a specific attribute. The stateattr function takes two arguments. The name of an entity, in this case our group.vacationlights, and the name of an attribute, entityid. Then we use | random to pick just one.
Lines 11 – 13 turns on our chosen entity. Since the entity could be a light or a switch, we are going to call the homeassistant.turnon service which will turn on any entity that has that capability. For entityid, we are going to use another template, but this time we will call the states function and pass it the name of our text helper to get the entity id of our current light.
Lines 14 – 15 delays our script for a random number of minutes. To do that we are going to use yet another template. This one will use the range function to get a list of numbers between 5 and 59. Then we use | random to pick just one from the list. And lastly | int to ensure what returns is an integer since delay expects a number.
Lines 16 – 18 turns off our chosen entity. We call the homeassistant.turnoff service and use the same template from the action where we turned on the device.
Lines 19 – 22 just resets the value of our text helper to ‘None’ which isn’t really needed. But you could add it to your Lovelace UI if you want to see what entity this script chose as it is running.
Now if you are interested in using multiple lights you could replace replace action between 6-10 with this:
- service: input_text.set_value
      target:
        entity_id: input_text.current_random_light
      data:
        value: >
            {% set light_count = state_attr('group.vacation_lights', 'entity_id') | count %}
            {% set lower_limit = light_count - 1 %}
            {{ state_attr('group.vacation_lights', 'entity_id')[range(0,lower_limit) | random :light_count] |join(',') }}
What this will do is pick a random range of entities from the list and create a comma delimited list of random entities that you could pass to your turn on and off service.
I haven’t tested how well that will work other than making sure that bit of jinja grabs a random list of entities from the group and creates a comma delimited list. But if you would rather have multiple entities involved, I hope it gives you a head start on a solution.
After you have your script defined, save it.
Automating This Thing
Next up is automating this whole thing.
So head to Configuration > Automations and click the “Add Automation” button in the lower right.
I called this automation “run vacation lights”
And I included three triggers.
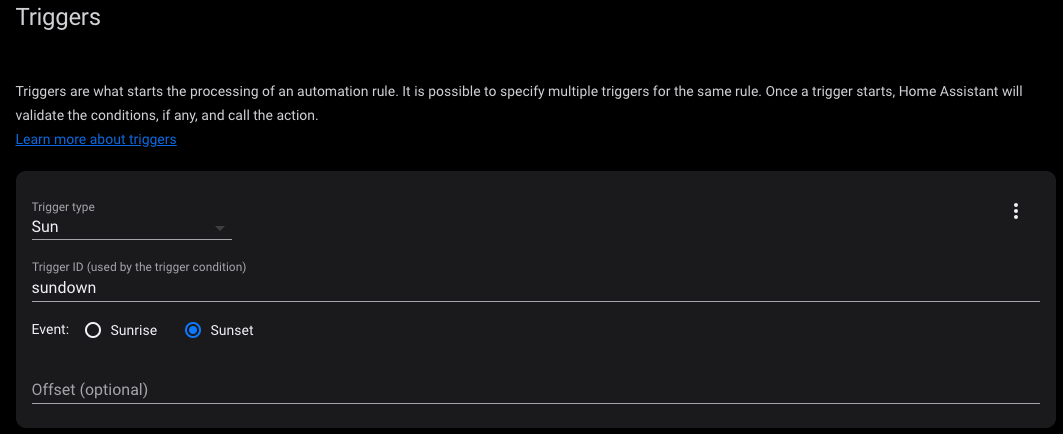
The first trigger is when the sun goes down, since during the say the lights wont be all that noticeable. So trigger type is sun and event is sunset. And I gave it a trigger id of sundown which will come in handy in the choose action we are going to use.
The second trigger is sunrise. So trigger type is sun, and event is sunrise, and for trigger id I called it sunup.
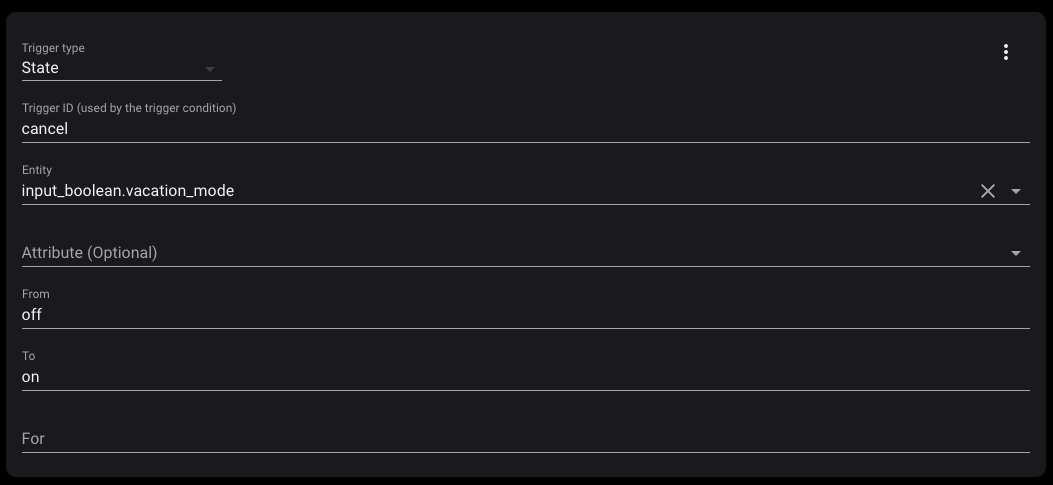
And the third trigger is when vacation mode is turned off. This is for those times in which we come home while the effect is running.
So trigger type is state, entity id is our vacation mode input boolean, and we are looking for times when it goes from on to off. And we set trigger id to cancel
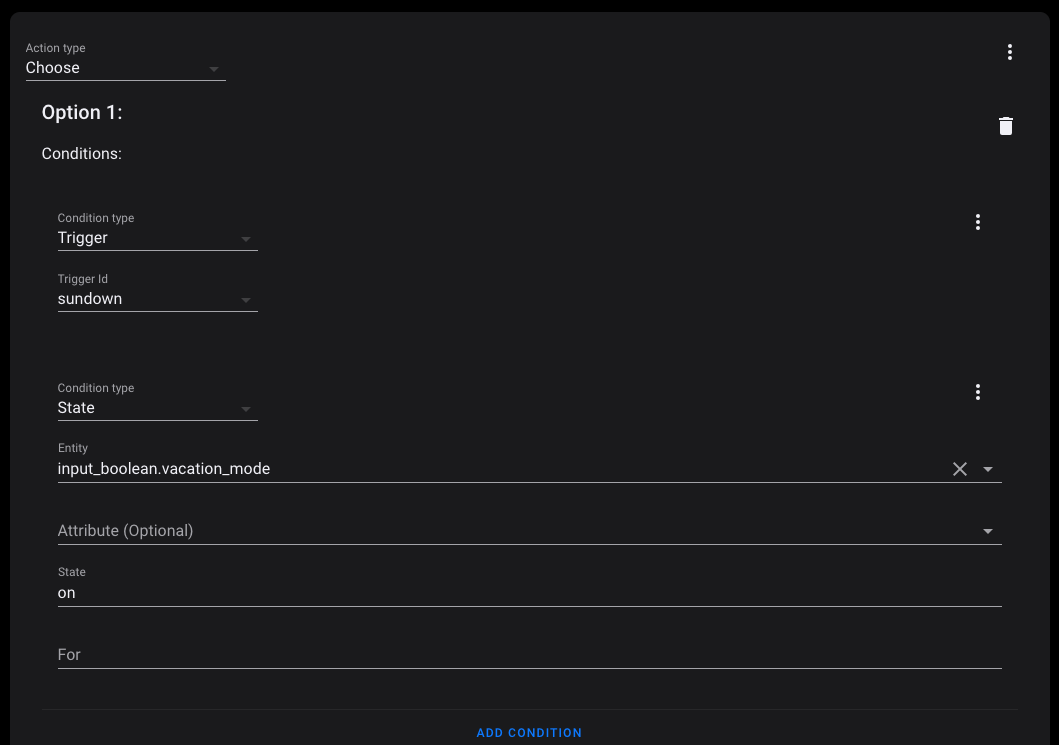
For actions we are going to use the choose action so we can either turn on our lighting script or turn it off.
So action type will be choose.
And for Option 1 we will look at two conditions.
1: the trigger = sundown
2: vacation mode = on
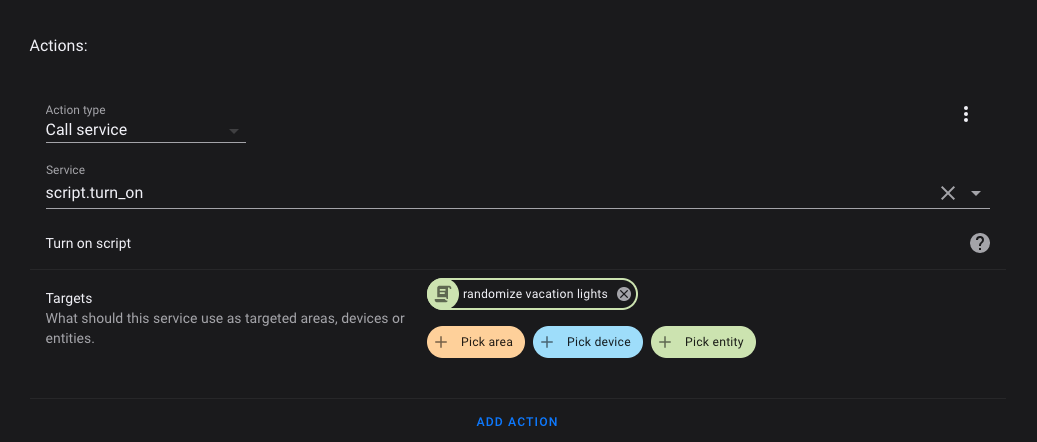
Then if both of those conditions are met we turn on our lighting script:
Then for Option 2 we will like for one of two different conditions. So we set condition type to Or then add our two conditions:
- Trigger = sunup
- trigger = cancel
Then for actions under this option we turn off our lighting script:
The YAML for this automation looks like:
- id: '1627174942201'
  alias: run vacation lights
  description: ''
  trigger:
  - platform: sun
    event: sunset
    id: sundown
  - platform: sun
    event: sunrise
    id: sunup
  - platform: state
    entity_id: input_boolean.vacation_mode
    id: cancel
    from: 'off'
    to: 'on'
  condition: []
  action:
  - choose:
    - conditions:
      - condition: trigger
        id: sundown
      - condition: state
        entity_id: input_boolean.vacation_mode
        state: 'on'
      sequence:
      - service: script.turn_on
        target:
          entity_id: script.randomize_vacation_lights
    - conditions:
      - condition: or
        conditions:
        - condition: trigger
          id: sunup
        - condition: trigger
          id: cancel
      sequence:
      - service: script.turn_off
        target:
          entity_id: script.randomize_vacation_lights
    default: []
  mode: single
Once you have your automation set, save it, and you are ready to start using your randomized lighting effect.
Hopefully that gives you a good starting point for building a simulating human presence automation for your smart home. I have some other ideas for how to make this better by including multiple devices instead of one, some media players to make the presence more audible, and perhaps spreading the effect out over 24 hours.
If you haven’t subscribed to my YouTube channel be sure to do that so you wont miss the next video. And reach out to me on twitter @thejeffreystone and let me know what changes you make to this setup.
Until next time, Go Automate the Boring Stuff.