Migrating from the Darksky API to NWS Weather API (Updated)


Apple’s recent purchase of Darksky means the API that many of use have been using for weather information is shutting down.
I first saw it from @CCOSTAN’s retweet (if you are not following him you should):
Or from Darksky’s own blog post. Technically we currently have until the end of 2021 to move to something else. Personally I wouldn’t wait until 2021. Apple could always decide to kill it sooner.
I went ahead and moved to the NWS Weather Service Integration.
It’s free and it contains everything you need for the basic use. Let me walk you through how I set this thing up. And then I will cover some sensors you can add to make your life a little better.
Adding the NWS Integration (Prior to Version 109)
First, of course, you will need to add the integration to your Home Assistant Configuration. If you are using Home Assistant prior to version 109.0 then you are in the right spot. If you have already upgraded, then jump down to Adding the NWS Integration (After version 109).
Just open your confirmation.yaml in your favorite text editor and add the NWS Platform to your Weather integrations.
weather:
  - platform: darksky
    api_key: !secret darksky_api
  - platform: nws
    api_key: !secret nws_api_key
Whether you use a secrets.yaml or enter it directly in your configuration.yaml your api key can literally be anything you want. You just want to include an email account so the NWS can contact you if something goes wrong. Personally I have a free gmail account for all of these house based accounts just to keep the email all in one spot. But you can use whatever email you have. YOLO right?
For example your api key could be bceubvbrve2634r93$%-yolomaster@gmail.com, but be sure to choose a different one. And make it random (except for your email of course) to please the security gods and because if you have the same api key as someone else I suspect you might get blocked for hitting the api too many times.
The Home Assistant docs say you can specify a station, but if you don’t it will just use the closest one based on the longitude and latitude you set when you configured your house’s location. If you want to gets specific you can get a list of station names from the NWS and then just add the following line under your api key with your preferred station callsign:
station: WKRP
You actually have one more optional option to choose. Do you want the forecast in day and night period increments or hourly increments? I used the default day and night mode so I didn’t have to specify a mode. But if you want the forecast in hourly periods of time you will want to add the following under api key:
mode: hourly
If you have added all the options your final configuration entry should look something like:
weather:
  - platform: darksky
    api_key: !secret darksky_api
  - platform: nws
    api_key: !secret nws_api_key
    station: WKRP
    mode: hourly
I shouldn’t’ have to say it, but WKRP isn’t a real weather station, so don’t try to use it.
For now do not touch the Darksky configuration. We will comment it out once we are good we have everything we need. No need to shut things off until we have the replacement in place.
Once you have added the NWS platform now it’s time for the almighty reboot to make the next part easier.
Adding the NWS Integration (After Version 109)
If you have upgraded to Home Assistant version 109.0 or later you are in the right spot.
Adding the integration is now done via the integration panel. Just head to the Configuration panel and choose Integrations.
The handy search options makes quick work of this list. Type nws and hit enter. The choose National Weather Service (NWS) and you will get this nice popup:

The API key can literally be anything you want. You just want to include an email account so the NWS can contact you if something goes wrong. Personally I have a free gmail account for all of these house based accounts just to keep the email all in one spot. But you can use whatever email you have. YOLO right?
For example your api key could be bceubvbrve2634r93$%-yolomaster@gmail.com, but be sure to choose a different one. And make it random (except for your email of course) to please the security gods and because if you have the same api key as someone else I suspect you might get blocked for hitting the api too many times.
By default the form should have your Latitude and Longitude from your config. Just leave them unless you want to get weather from another location.
And if you want to use a specific weather station you can enter one by grabbing the call sign from the NWS. If you don’t add one if wil auto pick the near based on your Lat/Lng.
Then Restart Home Assistant.
We Got Sensors Here!
Actually, we don’t.
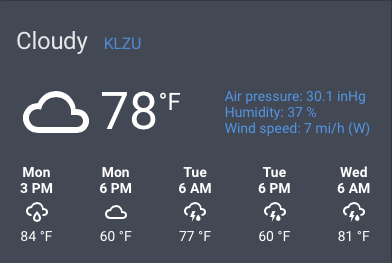
If you were using the Darksky sensors the first thing you will notice is there are no built-in NWS sensors like temperature_low or cloud_cover. What you get is a weather entity named after the station the platform found. In my case weather.klzu if you configure this via the yaml and weather.klzu_daynightand weather.klzu_hourly if you used the integration panel. Any of them contain a bunch of attributes.
For most people the lack of sensors won’t matter. You will probably just use the main weather widget which points to the weather entity and be all they need.
I relied on those sensors for various announcements and automations based on temperature. So I had to make some sensors that parsed the attributes of that weather entity. You could just skip the sensors part and access the attributes directly, but I wanted an easier way to remember. Nothing like having to stop in the middle of automation or writing a notification to have to go look up the exact path to the attribute. amiright?
If you want to follow-along with my GitHub repo you will find all these new sensors in my weather.yaml in the sensors folder.
Depending on how your configuration is built you may have the add the following sensors as entries under your sensor heading in your configuration file.
sensor:
But you have your sensors in another file or directory, like me, you should be able to create a weather.yaml or add them to an existing file already there. For example, all of my sensors are kept in a sensor directory. And any yaml file I create in that directory will contain sensor configurations. It might be overkill for a small Home Assistant config, but I like to be somewhat organized.
If you want to do something similar just add the following or replace your current line with:
sensor: !include_dir_merge_list sensors
Now let’s get to making sensors!
Side Note:
You will want to build the following sensors using the weather entity your integration method created.
If you are pre Home Assistant 109.0 that entity will be something like weather.klzu.
If you are using Home Assistant version 109.0 or layer you will want to use weather.klzu_daynightor weather.klzu_hourly .
Current Forecast Sensor
First sensor is simply to get the current forecast. I need this sensor for my audible forecast announcements.
nws_current_forecast:
  friendly_name: 'Current Forecast'
  value_template: "{{ states.weather.klzu.attributes.forecast[0].detailed_description }}"
For anyone that uses python the forecast[0] will make sense. If you don’t then what is happening is the forecast is broken in multiple parts. It is actually an array, and you would grab the first element in the forecast by using forecast[0] and then since you want the detailed description you just add that so you get states.weather.klzu.attributes.forecast[0].detailed_description
The first element will always be the forecast for the upcoming period of time. If you want the second you will want states.weather.klzu.attributes.forecast[1].detailed_description.
It may seem confusing at first, but the index or the [1] part is always 1 less than the one you want. If you are figuring this out as you go the template section of your Home Assistant Developer page will be your friend.
You could always skip defining the sensor and just leverage {{ `states.weather.klzu.attributes.forecast[0].detailed_description` }} every time you wanted to show the current forecast, but I figured {{ states.sensor.nws_current_forecast.state }} was easier to remember although perhaps not as descriptive. Pick your poison.
Current Temperature Sensor
This one is less need than the last, but I want a consistent sensor pattern. The following code creates sensor.nws_current_temperature
nws_current_temperature:
  friendly_name: 'Current Temperature'
  value_template: "{{ states.weather.klzu.attributes.temperature }}"
  device_class: temperature
You could just skip it and use the value in the value_template but I’m weird as you might have already figured out. The device class ensures that Google Home, and Home Assistant, will see the sensor as a temperature sensor.
Current Rain Chance
This one is simply to use in automations around rain chance and gets the rain for the first forecast period, which in theory is happening soon.
nws_current_rain_forecast:
  friendly_name: 'Current Rain Chance'
  value_template: "{{ states.weather.klzu.attributes.forecast[0].precipitation_probability }}"
  unit_of_measurement: '%'
I haven’t checked but I think this should get the rain chance in the next hour if you choose the hourly mode.
Daytime Temperature Sensor
This one is where things get a bit more complicated. I have a “Clothing Forecast” that relies on the forecast temperature during the day to offer a clothing suggestion to my son during his good morning announcement. If you are poking around the weather.yaml you will see it. The following code creates sensor.nws_daytime_temperature.
nws_daytime_temperature:
  friendly_name: 'Daytime Temperature'
  value_template: >-
    {% if states.weather.klzu.attributes.forecast[0].daytime == True %}
       {{ states.weather.klzu.attributes.forecast[0].temperature }}
    {% elif states.weather.klzu.attributes.forecast[1].daytime == True %}
       {{ states.weather.klzu.attributes.forecast[1].temperature }}
    {% endif %}
  device_class: temperature
This isn’t a high temp so much as what is the forecast for the next few hours. Since I don’t know whether next few hours are daytime or night time I have to check the daytime attribute. So it essentially checks the first forecast period to see if that is a day forecast and if it is true it uses the temperature from that period. However if I am looking at Home Assistant and it’s 10pm, then the next day period is going to be the second one or weather.klzu.attributes.forecast[1]
I am not sure how this works if you choose hourly mode instead of the default daynight, so you may need to play around in the template section of developer tools to get it dialed in. You should be able to copy anything in the value_template and test it.
Other “Current Sensors”
I also created some other current sensors to leverage the historical_stats sensors. If you know of a better way to do that let me know in the comments or hit me up on twitter. I would love to be able to strip this out if it wasn’t needed for the historical stats. But since it is an attribute and not an entity_id I haven’t tired to figure it out. The following code creates 4 sensors: sensor.nws_current_condition and sensor.nws_current_humidity and sensor.nws_current_visibility and sensor.nws_current_windspeed.
nws_current_condition:
  friendly_name: 'Current Condition'
  value_template: "{{ states.weather.klzu.state }}"
nws_current_humidity:
  friendly_name: 'Current Humidity'
  value_template: "{{ states.weather.klzu.attributes.humidity }}"
nws_current_visibility:
  friendly_name: "Current Visability"
  value_template: "{{ states.weather.klzu.attributes.visibility }}"
nws_current_windspeed:
  friendly_name: "Current Windspeed"
  value_template: "{{ states.weather.klzu.attributes.wind_speed }}"
These are purely for RandomStat tweets…@CCOCSTAN style. And who knows maybe I’ll find some use for them later.
Overnight Low Sensor
Since I rely on the overnight low in some automations, *cough* and tweets, I needed a sensor that would get me what the overnight temperature was going to be. I call this overnight low, and I guess that is technically what it is but it is not meant to be the actual low for the day. Just the low overnight. So I know to bring in the Lemon tree.
To get it I used the same methodology I used for the daytime temperature above except this time I am checking to see if the daytime attribute is false. If you are using the hourly mode you may not be able to use these same indexes. Or at the least you may have to look further a head. The following code creates one sensor: sensor.nws_overnight_low.
nws_overnight_low:
  friendly_name: "Overnight Low"
  unit_of_measurement: ''
  value_template: >-
    {% if states.weather.klzu.attributes.forecast[0].daytime == False %}
       {{ states.weather.klzu.attributes.forecast[0].temperature }}
    {% elif states.weather.klzu.attributes.forecast[1].daytime == False %}
       {{ states.weather.klzu.attributes.forecast[1].temperature }}
    {% endif %}
Future Forecast Sensors
The last four sensors deal with the future forecast which in my use case is tomorrow’s forecast. I use these in nightly audible announcements to let people know what tomorrow’s forecast will be along with forecast for tomorrow night. I break out the rain or precipitation chance. The downside is I don’t know if it’s snow or rain. If that becomes and issue I will add one in for condition for the same period which should be able to tell me if it is rain, thunderstorm, or snow or whatever.
The following code creates four sensors: sensor.nws_forecast_tomorrow and sensor.nws_forecast_rain_tomorrow and sensor.nws_forecast_tomorrow_night and sensor.nws_forecast_rain_tomorrow_night.
nws_forecast_tomorrow:
  friendly_name: "Forecast Tomorrow"
  value_template: >-
      {%- if states.weather.klzu.attributes.forecast[1].daytime == True %}
         {{ states.weather.klzu.attributes.forecast[1].detailed_description }}
      {% elif states.weather.klzu.attributes.forecast[2].daytime == True %}
         {{ states.weather.klzu.attributes.forecast[2].detailed_description }}
      {%- endif %}
nws_forecast_rain_tomorrow:
  friendly_name: "Rain Chance Tomorrow"
  unit_of_measurement: '%'
  value_template: >-
      {%- if states.weather.klzu.attributes.forecast[1].daytime == True %}
        {{ states.weather.klzu.attributes.forecast[1].precipitation_probability }}
      {% elif states.weather.klzu.attributes.forecast[2].daytime == True %}
        {{ states.weather.klzu.attributes.forecast[2].precipitation_probability }}
      {%- endif %}
nws_forecast_tomorrow_night:
  friendly_name: "Forecast Tomorrow Night"
  value_template: >-
      {%- if states.weather.klzu.attributes.forecast[1].daytime == True %}
        {{ states.weather.klzu.attributes.forecast[2].detailed_description }}
      {% elif states.weather.klzu.attributes.forecast[2].daytime == True %}
        {{ states.weather.klzu.attributes.forecast[3].detailed_description }} tomorrow night
      {%- endif %}
nws_forecast_rain_tomorrow_night:
  friendly_name: "Rain Chance Tomorrow Night"
  unit_of_measurement: '%'
  value_template: >-
      {%- if states.weather.klzu.attributes.forecast[1].daytime == True %}
        {{ states.weather.klzu.attributes.forecast[2].precipitation_probability  }}
      {% elif states.weather.klzu.attributes.forecast[2].daytime == True %}
        {{ states.weather.klzu.attributes.forecast[3].precipitation_probability  }}
      {%- endif %}
These were a little tricker to figure out since depending on the current time I might have to jump ahead to the third or fourth period to get the forecast for tomorrow and tomorrow night. Again, if you are using the hourly mode you will need to figure out the right period for what you are trying to do.
Cleaning up the Config
After you have created any sensors you are interested in you just need to comment out the Darksky platform in your configuration.yaml:
weather:
  # REMOVING darksky integration since API is EOL in 18 months. Migrated to NWS
  # - platform: darksky
  #   api_key: !secret darksky_api
  - platform: nws
    api_key: !secret nws_api_key
Remember to comment out the darksky platform under your sensor heading as well. Then before you reboot, just update your lovelace so that your weather widget points to the right weather. entity. Then you are free to reboot.
And with any luck your will boot back up without issue. Just verify that all your sensors are in place, and then pour yourself a nice beverage of your choice.
Final Thoughts
This is a super simple migration, but of course there are other Weather APIs out there you can use. However if you are in the US, the NWS one appears to work well. The one thing I don’t have is a cloud coverage sensor. So I am just going to relay on the condition attribute and for now just fire automations when it is “cloudy.”
If you find this article useful leave a comment then hit that like button or leave a comment. I am working on future Home Assistant Content and hope to get on a more regular publishing cycle of once or twice a week. And of course, if you have questions around this or how to leverage this in your specific case let me know.
Until next time….Let’s Go Automate Something.